
The questions we get asked most, answered straight — from a team that specialises in traditional buildings and whole-house retrofit.
The basics
What is internal wall insulation with natural fibre and lime plaster?
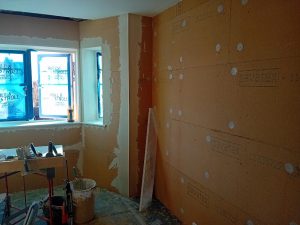
It’s a way of insulating a solid wall from the inside using a wood fibre board, finished with breathable lime plaster instead of standard gypsum. Unlike foam-and-plasterboard systems, nothing about it seals the wall up — moisture can still move through it, which matters a lot for older, solid-walled buildings that were built to breathe.
Why do you recommend natural fibre insulation over a standard foam-and-plasterboard system?
Because it plays to natural fibre’s real strengths, not just breathability for the sake of it:
-
- Vapour open: the board and plaster let moisture vapour pass straight through, so the wall keeps drying out rather than having water trapped inside it.
-
- Hygroscopic: wood fibre actively absorbs moisture from the air when humidity’s high, and releases it again when the air’s drier, rather than staying inert like foam.
-
- Moisture buffering: because of that hygroscopicity, the material buffers spikes in humidity — a shower running or a pan boiling doesn’t just sit in the room air, some of it’s absorbed into the wall and released slowly afterwards, keeping humidity and mould risk more stable.
-
- Better indoor air quality: no foams, no fire-retardant chemicals, no plastic vapour barriers off-gassing into the room.
-
- Sustainable: made largely from renewable timber industry by-products, with low embodied carbon, and biodegradable at end of life.
-
- Suited to traditional construction: built to work with a solid wall’s natural moisture movement.
-
- Tried and tested: used across Europe for decades, with a solid track record on historic and traditional buildings specifically.
-
- Decrement delay: wood fibre’s density slows and dampens temperature swings, so rooms hold onto winter warmth better and stay noticeably cooler in a hot spell too.
Is it right for my house?
Is my wall actually a good candidate for IWI?
Not automatically — this is the question that gets skipped far too often, and it’s the reason IWI sometimes gets a bad name. Before we so much as order a board, we need to rule out the things that can make it a bad idea, or mean it needs a different approach.
What would rule IWI out, or change the approach?
-
- Damp: rising or penetrating damp that hasn’t been sorted first — insulating over a damp wall traps the moisture in, it doesn’t fix it.
-
- Embedded timber: joist ends, bonded lintels or other timber built into the wall can end up sitting in a colder, damper zone once insulation goes on.
-
- Exposure: elevations taking a real battering from wind-driven rain need extra thought.
-
- Previous repairs: cement render, hard pointing or gypsum plaster usually need addressing first.
What checks happen before you touch my walls?
A proper pre-installation survey, not a five-minute look round. We open up small test areas where needed to confirm exactly what the wall’s built from, how thick it is, what state the mortar and existing plaster are in, and where the damp risks actually sit.
What’s a hygrothermal risk analysis, and why does it matter?
It’s modelling how heat and moisture will move through the wall once insulation goes on, specifically to check the risk of interstitial condensation — condensation that forms inside the wall build-up rather than on the surface, so you don’t see it happening until it’s already caused damage. It’s the single biggest factor in whether an IWI job lasts decades or causes problems within a couple of winters.
What’s the difference between a Glaser calculation and WUFI?
A Glaser calculation is a simplified, steady-state estimate, and it’s fine for straightforward, lower-risk walls. For anything more complex — solid walls, historic or unusual construction, or renders that aren’t very breathable — we’ll run a full WUFI simulation instead, which models how the wall performs over a whole year rather than a single cold snap.
Do I need Listed Building Consent?
If the property is listed or in a conservation area, quite possibly — and this can add several weeks to the timeline, so it’s worth starting the conversation early.
Getting the junctions right
Why do junctions matter more than the flat part of the wall?
Because almost every IWI failure happens at a junction, not in the middle of the wall. The flat, open part of a wall is the easy bit.
What happens where the insulated wall meets another wall or the ceiling?
Cold can track round the corner from an uninsulated party wall or partition, or up into an uninsulated ceiling, creating a cold spot right at the edge of the insulation — exactly where condensation and mould like to start. So the insulation is returned a short way along the adjoining wall (typically 300–500mm) and up into the ceiling void, to break that bridge properly.
What about floor joists built into the wall?
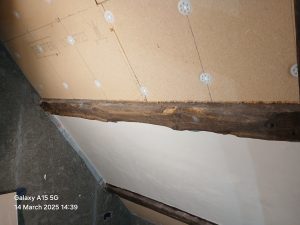
They sit right in the zone most at risk of interstitial condensation once insulation goes on, so they get their own treatment. Depending on condition and access, that might mean:
-
- Packing the void around the joist end with offcuts of flexible wood fibre insulation.
-
- Parging (rendering) around it with lime mortar to seal out air — lime’s alkalinity also discourages rot and insect activity.
-
- Applying a hydrophobic (water-repelling) treatment to the timber.
-
- Where a joist end is already showing decay, trimming it back to sound timber and hanging it off the wall on a joist hanger with a small ventilated air gap behind.
Whichever method’s used, the aim is the same: keep the timber dry, and stop warm, moist room air from reaching it.
What about window reveals, cornicing or coving?
Full-thickness board doesn’t always fit without blocking light or losing period detailing. In those spots we typically use a thinner IWI board instead — it gives up a bit of thermal performance right at that narrow strip, but still meaningfully cuts the cold bridge without hacking off original detailing.
What’s airtightness got to do with it?
Board joints and all the junctions above get taped and sealed as part of the job, not as an afterthought. The aim is to stop air — and the moisture it’s carrying — sneaking in behind the insulation, since that’s what causes interstitial condensation even when the wall build-up itself is sound.
The system, and the work itself
What products or system do you actually use?
It varies room to room depending on what the survey and risk analysis tell us, but here’s a real-world example — the system Unity Lime supply for internal wall insulation with a lime plastered finish, working outward from the existing masonry:
-
- Existing masonry wall, laid in lime mortar
-
- Levelling coat where needed — Baumit NHL Thermo or RK38 lime plaster
-
- 5mm Baumit RK70 N lime bonding coat
-
- ISOLAIR MULTI wood fibre insulation board (Pavatex), fixed with adhesive and mechanical fixings
-
- 6–8mm Baumit RK70 N lime plaster base coat with reinforcing mesh (Baumit Startex)
-
- 3–4mm Baumit RK70 N lime plaster finish coat
Done properly, a system like this typically achieves a U-value of somewhere between 0.60 and 0.28 W/m²K depending on board thickness.
What’s the step-by-step process?
Strip-out back to the substrate, wall prep and a levelling coat if needed, a bonding coat, the wood fibre boards fitted, a lime plaster base coat with reinforcing mesh, a drying pause of roughly 7–10 days, a finish coat, several weeks of curing, and finally decorating with a breathable paint or limewash once it’s fully cured.
How long does it take?
Every project’s different depending on room size, how many rooms, and time of year — lime plaster dries more slowly in cold or damp weather — but here’s a realistic range for a single average room:
| Stage | Typical duration | What’s happening |
|---|---|---|
| Survey & risk analysis | A few days on site, plus 1–3 weeks for reports | Wall build-up survey, damp checks, hygrothermal (Glaser/WUFI) risk analysis, heritage checks if needed. |
| Strip-out & wall prep | 1–3 days per room | Stripping back to substrate, removing skirting and fittings, treating damp or timber issues, levelling coat if needed. |
| Fitting the wood fibre boards | 1–2 days per room | Boards glued and mechanically fixed to the wall, then levelled. |
| Lime plaster coats | 1 day application, then 7–10 days drying per coat | Usually 2–3 coats. Each needs to dry before the next goes on. |
| Final curing | 2–4+ weeks after last coat | Plaster fully hardens (carbonates). No heaters, no rushing this bit. |
| Decorating | From week 4–6 onward | Breathable paint or limewash only. |
Doing a whole house room by room means the project runs over several months rather than weeks — not because the crew is on site the whole time, but because each room’s plaster needs to cure before it can be finished and decorated.
Living with the work
What disruption should I expect?
-
- Dust: strip-out kicks up dust, especially where old plaster comes off. We sheet rooms off, but some dust reaching adjoining areas is normal.
-
- Room access: the room being worked on is generally out of action — cleared and inaccessible — for the length of that room’s work.
-
- Fixtures and services: skirting, socket covers and sometimes radiators come off and go back on, which can mean short power-downs to that room’s circuit.
-
- Smell: lime plaster has a distinctive, slightly damp, earthy smell while it cures — it fades as it dries out.
-
- Heating and ventilation: curing rooms shouldn’t be heated or sealed up to force-dry them — you’ll need to leave a room a bit cooler and well-ventilated (not draughty) for a few weeks.
Can I stay living in the house while the work happens?
Usually, yes. Most homeowners find it easiest to do one or two rooms at a time so the rest of the house stays usable throughout.
When can I decorate, and what paint should I use?
Not until the plaster’s fully cured — commonly 4–6 weeks after the last coat. After that, stick to a breathable paint or limewash. Standard emulsion can seal the surface and trap moisture, which defeats the point of the whole system.
Glossary
Retrofit has its own jargon. Here’s what the important terms actually mean.
| Term | What it means |
|---|---|
| IWI | Internal Wall Insulation — insulating a wall from the inside face, as opposed to EWI (external wall insulation). |
| Solid wall | A wall with no cavity — a single thickness of brick, stone or cob, common in buildings from before the 1920s. |
| Vapour permeable / “breathable” | A material that lets moisture vapour pass through it, so a wall can dry out rather than trap water inside. |
| Hygroscopic | Able to absorb moisture from the surrounding air when humidity’s high, and release it again when the air’s drier — a key property of natural fibre insulation. |
| Moisture buffering | The effect of a hygroscopic material smoothing out spikes and dips in indoor humidity by absorbing and slowly releasing moisture, rather than the room’s humidity swinging freely. |
| Decrement delay | The time lag between a wall’s outer surface heating up and that heat reaching the inside surface. A longer decrement delay means a wall responds more slowly to outside temperature swings, helping keep rooms cooler in hot weather as well as warmer in winter. |
| IAQ (Indoor Air Quality) | A measure of how clean and healthy the air inside a building is — affected by ventilation, moisture levels, and whether materials release VOCs or other chemicals into the air. |
| U-value | A measure of how much heat passes through a wall or element — the lower the number, the less heat is lost. |
| Interstitial condensation | Condensation that forms inside a wall build-up rather than on its surface — invisible until it’s already caused damage. |
| Dew point | The temperature at which air holding moisture starts to condense into liquid water. |
| Hygrothermal | To do with the combined movement of heat and moisture through a building material. |
| Hygrothermal risk analysis | Modelling how heat and moisture behave in a wall build-up, to check it dries out faster than it gets wet. |
| Glaser method (BS EN ISO 13788) | A simplified, steady-state condensation risk calculation — suitable for straightforward, lower-risk walls. |
| WUFI | Wärme und Feuchte instationär, German for “transient heat and moisture”. Dynamic hygrothermal simulation software (to BS EN 15026) that models a wall’s heat and moisture performance over a full year. Used for higher-risk or more complex walls, including most solid and historic construction. |
| PAS 2035 | The UK code of practice for retrofitting existing homes, covering assessment, design and quality-checking of measures like IWI. |
| Retrofit Coordinator | The person responsible for overseeing a retrofit project under PAS 2035, making sure the right assessments happen before work starts. |
| Capillary active | A material’s ability to absorb and release moisture through its pores, helping a wall dry in both directions. |
| Carbonation | The chemical process by which lime plaster hardens, slowly absorbing carbon dioxide from the air — why it needs weeks, not days, to cure. |
| Thermal bridging (cold bridging) | A point in a wall — a floor junction, window reveal, etc. — where heat escapes faster than through the rest of the wall, and where condensation risk is highest. |
| Rising / penetrating damp | Moisture entering from the ground (rising) or driven through the wall by wind and rain (penetrating) — both need treating before insulating. |
| Base coat / finish (skim) coat | The layers of a lime plaster system — a thicker reinforced base coat followed by a thinner finishing coat. |
| Levelling coat / parge coat | A preparatory coat of lime mortar applied to an uneven wall before boarding, to give a flat, true surface for the insulation to sit on. |
| Substrate | The original, bare wall material underneath any finishes — what’s left once paint, wallpaper and old plaster are stripped off. |
| ISOLAIR MULTI | A Pavatex wood fibre insulation board used in lime-plastered IWI systems, offering active moisture control by absorbing and redistributing moisture within the board itself. |
| Bonding coat | A thin lime coat applied to key (grip) the wall surface, preparing it for the insulation board to be fixed on. |
| Reinforcing mesh | An open glass-fibre mesh embedded into the base coat of lime plaster to control cracking and add strength — sold under names like Baumit Startex. |
| Junction detailing | How insulation is returned, tapered or sealed where a wall meets another wall, a ceiling, a floor or an opening — the point where most IWI problems actually start. |
| Airtightness (tapes and sealants) | Sealing joints between boards and at junctions so warm, moist air can’t get behind the insulation, where it would cool and risk condensing inside the wall. |
| Reveal | The internal side wall of a window or door opening, between the frame and the face of the wall — often too narrow for full-thickness insulation board. |
| Joist end treatment | Moisture-control measures applied where a timber joist is built into an insulated wall — commonly wood fibre packing, lime parging, hydrophobic treatment, or trimming back onto a joist hanger. |
| Parging | Rendering the void around an embedded joist end with lime mortar to seal out air and moisture — lime’s alkalinity also discourages rot and insect activity. |
| Hydrophobic treatment | A water-repelling treatment applied to timber or masonry to reduce how much moisture it absorbs, lowering decay risk without stopping the material breathing. |
Sources and further reading
-
- Historic England — Insulating Walls in Historic Buildings: historicengland.org.uk
-
- SPAB (Society for the Protection of Ancient Buildings) — Energy Efficiency Research: spab.org.uk/advice/research
-
- PAS 2035 — retrofit standard overview: gov.uk / TrustMark PAS 2035 guidance
-
- Unity Lime — natural insulation and Baumit lime plaster systems: unitylime.co.uk
-
- Tales from the Joist End (Tracing Green) — practical guide to joist-end treatment options: tracinggreen.uk
-
- Retrofit Pattern Book — IWI to floor with joist junctions, construction detail drawings: retrofit.support
Lambert Home Builds — this guide is for general information and does not replace a site-specific survey, hygrothermal risk analysis or professional advice for your particular property.